Miscellaneous Options
The Miscellaneous Options page provides tabs in which you can enter the CMDB name and the format for CI names.
Enter the CMDB Name
The CMDB name is the name that will identify the CMDB associated with the current project. If you change the name on this page, the change is propagated throughout FootPrints.
- Select Administration | Miscellaneous Options from the CMDB homepage. The Miscellaneous Options page is displayed. The CMDB Name tab is displayed by default.
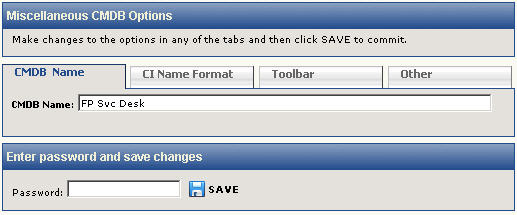
- Enter the name in the CMDB Name field.
- Click the
 Save button to save the name.
Define the CI Name Format
The CI Name format is the format used to identify Configuration Items.
- Select Administration | Miscellaneous Options from the CMDB homepage. The Miscellaneous Options page is displayed and the CMDB Name tab is displayed by default.
- Select the CI Name Format tab. Variables are provided to help fine-tune the ID. Any attributes that you have created are represented as variables as well, so that you can include any information you've associated with the CIs as identifiers. If you enter text in this field, that text is included in the name format for every CI. If you enter variables, the information associated with the CI that is represented by that variable is displayed when you view the CI's name. For example, if you were to enter:
%%CI_ID%% SvcDsk-%%MAKER%% %%MODEL #%% %%CI_TYPE_NAME%%
then the name might be displayed as:
14-1 SvcDsk-Cisco 7206 Router
To select variables, click the [Insert Variable] link. Default variables are as follows:
- CI ID—The CI ID is a number assigned to a CI when it is created. The CI ID is incremented by one and begins at one for each CI Type. For example, if you create five CIs of the CI Type "Router" in your CMDB, they will be identified as 1, 2, 3, 4, and 5 in their CI IDs.
- CI Qualified ID—The CI Qualified ID is a combination of the CI Type ID and the CI ID. When a CI is created, the Qualified ID is assigned as "CI_Type_ID-CI_ID". For example, if the fifteenth CI Type you created was for Laptops and you create a CI for six laptop computers, the CI Qualified IDs of these laptops would be 15-1, 15-2, 15-3, 15-4, 15-5, and 15-6.
- CI Revision—For every revision to a CI made after its initial creation, the CI Revision number is incremented by 1. Revisions are defined as changes to attributes or statuses. The addition of or change to a relationshp or links to Issues or contacts are not considered revisions.
- CI Type ID—The CI Type ID is a number assigned to a CI Type when it is created. The CI Type ID is incremented by one and begins at one for each CI Type. For example, if you create CI Types Router, Switch, Server, and Firewall, these will be identified as 1, 2, 3, and 4.
- Last Edit Timestamp—The timestamp of the last time a CI was edited. This has nothing to do with edits to Issues or contacts that are linked to the CI.
- Last Editor (userid)—The user ID of the last person to edit the CI.
- Submit Timestamp—The timestamp of the initial creation of the CI.
- Submitter (userid)—The user ID of the person who created the CI.
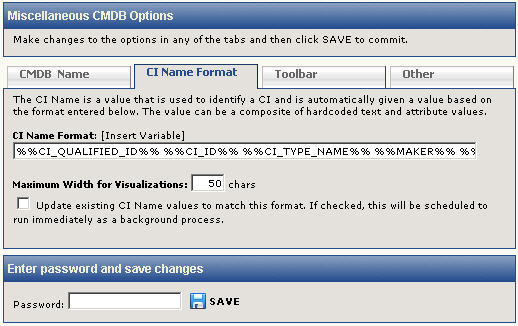
- To update all of the CI name values in the current CMDB according to changes you are about to submit on this page, click the "Update existing CI's Name values" checkbox. The new name format is then applied to all existing CIs as well as new ones when they are created. If you do not check this box, the new custom CI name format is only applied toCIs you create after you save the new format.
- Click the Save button to save the CI ID format.
Add Toolbar Buttons
The Toolbar tab of the Miscellaneous CMDB Options page enables you to add buttons to the CMDB homepage. The buttons are labeled Create CI Type, where CI Type is the name of a CI type. If you add a button, then, when it is clicked later, the create CI page for that CI type is opened. This provides a convenient way to speed up creation of new CIs by eliminating several mouse clicks. To add a toolbar button:
- Select Administration | Miscellaneous Options from the CMDB homepage. The Miscellaneous Options page is displayed. The CMDB Name tab is displayed by default.\
- Select the Toolbar tab.
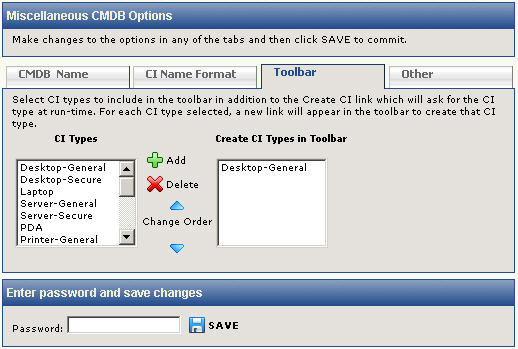
- Click on a CI type in the CI Types field that you want to add as a button.
- Click the
 Add button. The CI type is displayed in the Create CI Types in Toolbar field.
- Click the Save button to save the button. You must refresh the page in order to see the new button in the toolbar.
To delete a toolbar button:
- Select Administration | Miscellaneous Options from the CMDB homepage. The Miscellaneous Options page is displayed.
- Select the Toolbar tab.
- Click on the CI type that you want to delete in the Create CI Types field.
- Click the
 Delete button. The CI type is removed from the Create CI Types field.
- Enter your password and click the Save button to save the button. You must refresh the page in order to see the button deleted from the toolbar.
To change the order in which toolbar buttons are displayed on the CMDB homepage:
- Select Administration | Miscellaneous Options from the CMDB homepage. The Miscellaneous Options page is displayed.
- Select the Toolbar tab.
- Click on a CI type in the CI Types field that you want to move up or down in the order.
- Click the up or down arrow buttons to change the position of the CI type in the Create CI Types field.
- Enter your password and click the Save button to save the button. You must refresh the page in order to see the changed order.
Other Miscellaneous Options
The Other tab of the Miscellaneous Options page provides the following functionality:
- Enable timestamp override
- Set the number of columns for the Create/Edit/Details pages when viewing CIs
Enable Timestamp Override
When a CI page is created or edited, a timestamp is entered into the CI history for the time and date at which the create or edit took place. The administrator can override the timestamp by entering a different date and/or time in that field. To enable the override function, which allows the administrator to enter a different date and/or time, select "Yes" from the Enable Timestamp Override drop-down field on the Toolbar tab.
Set the Number of Columns
The Create/Edit/Details pages for a CI display attributes side by side to save space. Choosing more columns reduces the amount of scrolling you need to do on these pages. Choosing fewer columns accommodates large field names and small screen resolutions better. To set the number of columns, select the number from the "
How many columns should attributes use on the CI page?" drop-down field on the Toolbar tab. The minimum number allowed is 1 and the maximum is 6.